
The ultimate K40 mirror alignment guide for your k40 laser cutter equipment is here.
This tutorial contains some tips and ideas for the popular K40 laser machine type, but it may be used to any laser machine on the market because the science behind laser mirror alignment is the same.
90% of laser machine faults are caused by bad alignment of the equipment’s three mirrors, which are not aligning up with each other.
Some of you will have a machine of that 10% with a skewed or non square gantry, but follow through this guide to the end anyway and you will find a link my other guide how to fix gantry problems. But first, you have to identify the problems by following this guide.
Please read through the preface about this guide before you start to avoid doing it wrong.
In my old guide about K40 laser alignment i had numerous examples of readers who skipped some parts and ended up doing the alignment backwards. I know it´s tempting to skip a step or two, but please, read everything and let me know if something is not clear 🙂

Introduction
This guide will help you align your laser machine to perfection.
It is very important that you follow each step and not jumping around, you will miss important information or details how to identify your machines problems.
Tools you need to complete this alignment
– Any tools needed to adjust the mirrors on your machine.
– Screw drivers, sockets or wrenches to adjust mirror holders.
– Painters tape, labels or paper with adhesive backing for covering the mirrors when test firing.
– In rare occasions, files and drill bits to adjust the holes where mirrors are mounted.
– A pint of beer, wine or a good cup of coffee 😉
How to interpret the results
This guide has a lot of test-firing and looking at the tape/label what the beam does and where it moves. Some parts need you to identify if the beam moves up, down, left or right – when doing this the direction is always as if you remove the tape and hold it in front of you, if the dot has moved right when you look at the tape – you choose right in the sections below.
It does not matter wich way the tape was mounted – just keep it horizontally the same from the mirror to where you look at it.
Preparations
Adjust the tube if needed so you hit aprox. center on mirror 1.
Also, familiarize with the three adjustment screws on the mirrors which screw moves the mirror in what direction. This will help later in the alignment.
Machine locations and centering the beam
Here is a picture of different position i will refer to in this guide, please have a look to see what is what.
When i mention centering the beam, this has nothing to do with quality or power of your machine, it´s just a easy position to remember. You do not have to be exactly center – keep it close to center so it´s easy to see where the next test-fire will go.
Now, are you ready to align your laser machine? Let´s go!
Part 1 – mirror 1 and 2
This part identifies the movement of mirror 1, moving up and down (from rear to front) of your machine. Follow each step of the instructions and lick on the button corresponding with your problem to find the information how to solve it.
Step 1 – first fire
– Move the gantry to bottom as the first picture shows
– Do a test fire and have a look at the tape on the 2nd mirror.
– Adjust mirror 1 until you hit center on mirror 2 in bottom left position.

Step 2 – upper axis
– Move gantry to top right position
– Do a test fire and have a look at the tape on the 2nd mirror.

By looking at your tape – did your beam move up or down?
Click on the answer below to see the solution.
Your 2nd mirror is too low.
Make sure the bracket holding the mirror is square and not bent.
Remove the two screws holding the bracket, mark the position so you can put it back and add some shims between the bracket and the gantry so the 2nd mirror is lifted some.
Start over with the alignment and re-center the beam in furthest position and adjust more if needed.
A alternative solution is to lower mirror 1, but do not go that route until you tried the tips above first.
Visual example of movement up.
Your 2nd mirror is too high.
Make sure the bracket holding the mirror is square and not bent.
The solution for this problem is to bend down the bracket a bit if its bent up, which is the most common issue. Second solution is to lower 1st mirror but almost never needed.
Start over with the alignment and re-center the beam in furthest position and adjust more if needed.
Visual example of movement down.
Sweet, your vertical movement is already aligned. You can now go to the next step.
Visual example of perfect alignment.
Your 2nd mirror is too far to the left. Loosen the two screws holding the white plate and move it slightly to the right.
Start over with the alignment and re-center the beam in furthest position and adjust more if needed.
Visual example of movement to the left.
Your 2nd mirror is too far to the right. Loosen the two screws holding the white plate and move it slightly to the left.
Start over with the alignment and re-center the beam in furthest position and adjust more if needed.
Visual example of movement to the right.
Sweet, your horizontal movement is already aligned. You can now go to the next step.
Visual example of perfect alignment.
Part 2 – mirror 3 and laser head
Half way there! This part helps you align the laser head in square line with the 2nd mirror. We know the 2nd mirror is in line now since part 1, and now it´s time for the laser head.
Just remember, after each adjustment – re-center the dot on the laser head before test-firing up close to mirror 2 to see where the beam moved.It´s important that you do not touch the alignment at all from part 1.
Step 3 – bottom right
– Move the gantry to bottom right position
– Adjust mirror 2 until you hit center on mirror 3 (hole in the laser head) in bottom right position.

Step 4 – bottom left
– Move the laser head to bottom left and do a test fire and have a look at the tape on the 3rd mirror.
Your laser head is too low.
Mark the position of the three screws on the laser head with a pen or small mark, remove one screw at the time and insert a washer between the standoff and the plate holding the laser head.
Doing this will not ruin the location of the plate, confirm with your marking and adjust if it moved.
Start over with the alignment and re-center the beam in furthest position and adjust more if needed.
Visual example of movement up.
Your 2nd mirror is too high.
Make sure the bracket holding the mirror is square and not bent.
The solution for this problem is to bend down the bracket a bit if its bent up, which is the most common issue. Second solution is to lower 1st mirror but almost never needed.
Start over with the alignment and re-center the beam in furthest position and adjust more if needed.
Visual example of movement down.
Sweet, your vertical movement is already aligned. You can now go to the next step.
Visual example of perfect alignment.
Your laser head is too far away from the gantry. Loosen the three screws holding the bracket and move the plate up (if you look at your machine standing in front of it - looking down on the work area). Up - away from you.
Start over with the alignment and re-center the beam in furthest position and adjust more if needed.
Visual example of movement to the left.
Your laser head is too close to the gantry. Loosen the three screws holding the bracket and move the plate down (if you look at your machine standing in front of it - looking down on the work area). Down = towards you.
Start over with the alignment and re-center the beam in furthest position and adjust more if needed.
Visual example of movement to the right
Sweet, your horizontal movement is already aligned. You can now go to the next step.
Visual example of perfect alignment.
Laser head centering
It almost suffices to align the machine in a horizontal and vertical plane. The laser head is the final component. It’s typically not enough to hit the hole in the middle, but it’s close.
The simplest way to do this is to use my tool to cut a piece of 2 mm acrylic or wood, mount it on the laser head, test-fire in each of the four corners, and check the tape to ensure that your beam is hitting the lens well. There is an issue with the corners moving around excessively.
Since you have mastered the mirror alignment, I advise adding little pieces of paper between the mirror and the holder for the laser head in case you need to make any last-minute adjustments.
Conclusion
By all means necessary, you have now aligned your machine. If you’re still having issues, check to see sure the gantry is square, level, and parallel to your bed and machine.
I´m sorry to say it, but if this guide cannot align your machine, it has some bigger issues and a general guide like this will not cover the problems it might have if i want to keep it quick and helpful for 95% of the users.
Feel free to comment below if you have any questions.
Forums are just mean.. Trying to align and adjust mirror and fix other issues. This is what I get when I test fire (From the board obviously I have another issue.) the beam is curved.. slightly crescent shaped. It’s 3mm wilde as well. This first tap of the test button made that crescent and pin point. Now it’s just doing that weird crescent shape.
You are probably hitting the edge on a mirror, or inside the laser head. Use tape to identify which mirror. If its the head you need to adjust it to hit center, in the download page here you can find a alignment tool for the head. Just get it to barely cut or if you have a 3D-printer you can print it to align it 100% after.
You can do some test-firing, direct after turn off the laser machine and put your finger on the laser head. If its hot or warmer than ambient = you are hitting the edges inside the laser head.
I’m exhausted trying to align the mirrors. 3 kids being in the vicinity and a wife wanting her kitchen back.
I cannot get mirrors 1 and 2 to align consistently. For example, I manage to get it aligned in the bottom left, and when I move it back to the home position it’s WAY OFF alignment.
I’ve had the gantry out the machine and that’s square so can only assume the laser is shooting at an angle, being amplified the further I move away from home position??
I really don’t know and just guessing, would be great if someone could help
thanks
Paul.
If you follow the guide step by step it will tell you whats off.
Probably the gantry or mirror 2 is not in line with mirror 1 and gives you a sideway throw off in alignment.
I have spent WAY to long trying to align and center my mirrors. I have watched countless guides. Right now, I have it pretty close.
Mirror one: Good to go
Mirror two: Off by the slightest, approx 1/2mm.
Mirror three: Same, I’m assuming because of Mirror 2.
When I do my test cut, the laser is clearly hitting the wood, its smoking, cutting, just not cutting deep, at all.
So clearly, something is off.
I am going to follow your steps, and see what needs adjusting!
I have been trying to find support via phone, as I need my laser fixed asap, are you available via phone? or if needed, through this chat, today? around 5pm PST. I will follow your steps first, but if I just cant figure out that last tweak, I would be grateful for your assistance!
I´m alone with two kids, there is never a silent moment here to help via phone though.
But if needed i can help you on whatsapp with pictures and step by step to align it if you still need it.
Very grateful for this guide and thank you for the time you spend helping others. With that being said, I’m having problems with mirror #2 alignment at top left on gantry. The laser is hitting center left. Your guide says it to far left, needs to go to the right. Does it mean to swivel to the right or do I make new holes in the plate for the mirror to entirely move right?
Often the holes are a bit bigger than the bolts so the whole mirror assembly can move left and right a bit.
Loosen the 2 screws holding the angled white metal piece, move it a bit to the right (if you stand in front of your machine), and fasten the screws again.
Dont forget to re-aim in center with 2nd mirror in bottom position.
That is my problem. I’ve moved as far right as possible. The plate connecting to the gantry and the mirror on the plate.
If you center the beam in this position and test fire in top position, where does the beam hit – if you re looking from the perspective of the beam.
I think you are moving it the wrong way, or reading it from the from perspective 🙂
Hello again. I thought that I had posted a request for your help via WhatsApp but I don’t see it here. I would be very very grateful if you would be able to aide me because I am nearing a deadline to have this machine working. Thanks
I will email you shortly with a number you can add on Whatsapp.
Hi, thanks for a great guide and offering your spare time to help us all.
I have managed to set mirror 1 and 2 perfectly. Mirror 3 is giving me some resistance. Bottom right perfectly centred, Botton left moved around 4mm up. According to the guide, the head is too low, so I made a spacer and lifted the head, but machine went haywire and stopped reading the stoppers and goes past home and hits the edges with some noise.
I removed the spacer and all back to normal, is there any other way to get the head aligned, it does not have any other screws except the ones that fit it to the rail.
Many thanks
That is the only way. After you added the spacers make sure that the metal pin on both axis can hit the sensor in left and top position. Check this before starting the machine.
You probably did something so the stop-switches doesnt engage properly in 0x0 position.
Thanks mate, managed to make a metal spacer as I realised the metal was talking to the sensor. Now working properly. Thanks for your response ?
New issue arised. Mirror 1, middle spot on. Mirror 2, middle spot on bottom and top. Mirror 3, middle spot on bottom right and left, and top right. When moving to top left, beam drops around 2mm. Gantry out?
Correct, if top right is lower than center – top right is too high. If the dot is above center top right is too low.
Check the floor if its a dent in the floor pushing it up.
My latest machine had that issue. I took a hammer and pushed the shaft/handle on the floor from above pushing it down a bit, but be careful if you try that.
If you reverse the alignment with a red diode laser you can do it while pushing. See article here https://k40.se/k40-laser-lens-mirror/align-your-laser-machine-backwards/
Another solution is to lift the 3 other corners, add washers between floor and gantry, a bit more work though.
Ok, it’s top left though. So top right perfectly centered, then when moving to top left, drops down about 2mm
Yes, but its top right causing it.
I made a quick image. This is a view from the side.
Red is the beam, blue is mirror 2 and the laser head to the right.
Purple is just marking where center is.
On this picture the beam hits center in top right.
But as you can see, the beam hits below center in left position.
You probably have a slight movement on bottom positions too, as light cannot bend it just goes where it´s aimed.
This is caused by a beam leaning slightly upwards, and as the laser head is screwed down the top right corner is too high.
It might be a very unusal situation where bottom left is high and its the beam between 1 and 2 that´s leaning but its not causing issues other than top left for you.
You can try to do a 9-way test to be 100% sure.
On dot in each corner, plus 1 dot between the dots, so you get 3×3 dots. Left – middle – right in three positions (top – middle – bottom) – this will tell exactly where the issue is.
Image: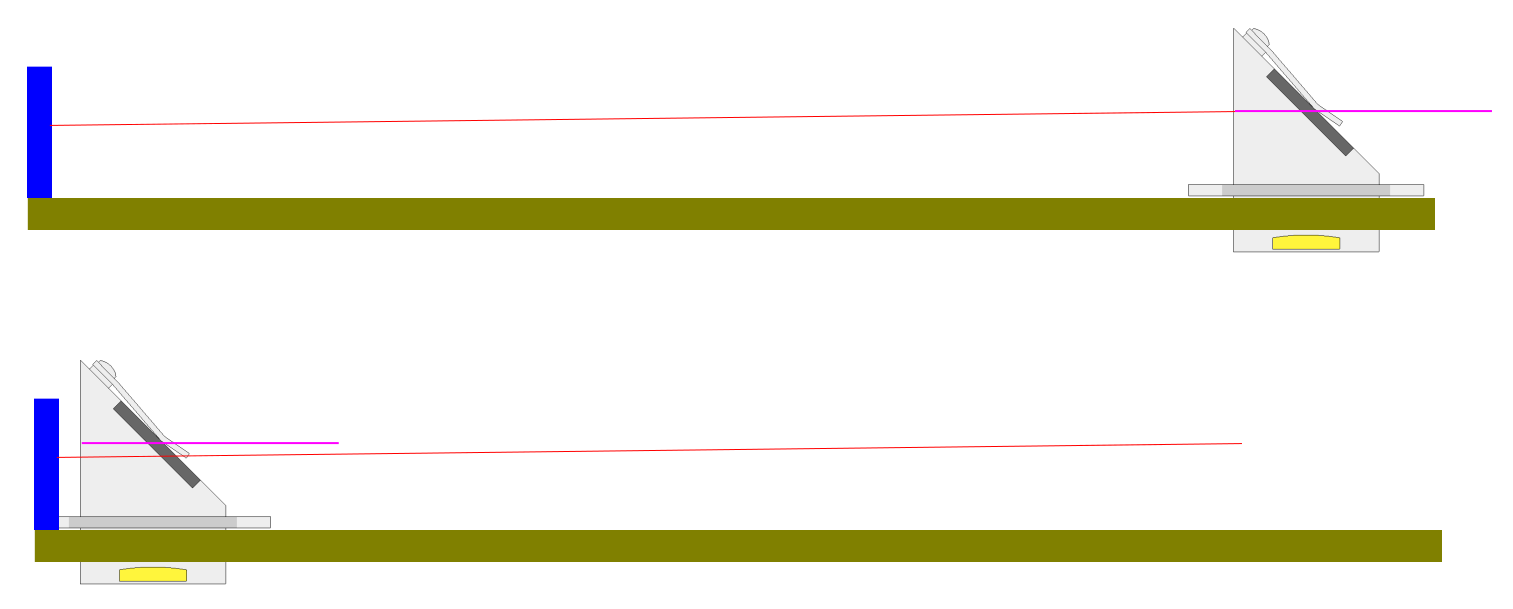
Thanks mate, will give that a go. Have not had to make changes to the gantry before, this is my 3rd machine, so going to be a new learning curve ?
Hi – great guide thank you! Just a quick question – just replaced laser tube and mirrors are all out, I’ve been fiddling around with the mirrors and then wondered if it’s critical for the tube to be levelled as well, and is this adding to my headaches if it isn’t! The one I took out had a little piece of rubber stuck to the protective ring around the tube – is it needed to somehow level the tube too?
Not critical. Light cannot bend, so you can have the laser tube in what angle you want. The first mirror sets the rule of where the beam goes next, and the beam does not have a memory of where it was before. Aligning the tube or lifting it is only needed to hit aprox. center on the 1st mirror.
Only situation where you need to adjust the tube is if the 1st mirror adjustment bottoms out and you cant angle it more, if that happens you might need to align the tube a bit.
Think of the beam as you are shooting a ball on a angled wall – it doesnt matter what position you are in, the ball will follow the angles of the walls you are shooting at.
Excellent , one less thing to worry about. Will need to try again following the instructions. This is what I got initially from moving the lens head around the four points of the bed. Bottom Right missed the hole in the final mirror / lens completely
This will align easy with this guide.
Every other guide I’ve seen discusses adjusting the three screws on the back of each mirror, where yours seems to only discuss moving the plates up and down or left to right to not adjust the direction of the beam, but to adjust the receiving mirror so the beam hits it in the center. Is this right? Doesn’t this assume that the mirrors start at a true 45 degrees and are square to each other (but just out of plane)?
I have tried other guides and made things worse, but now I’m in a situation where I need to zero everything out and start over, and I don’t see how this guide can help with that if there is no discussion of correcting misalignment from the screws.
Am I missing something? Thank you fir making the guide and for making this resource.
The three screws are only used to move the beam into center on each mirror before each stage of alignment. This is because if Mirror 1 and 2, and 2-3 are not in the same straight line you can never ever align that with the screws. In my guide the adjustment with the screws are merely a identification IF your mirrors are located wrong, and how to fix it.
Example: If you adjust mirror 1 to hit center on mirror 2, but when you move it close you are out of center, this can never be adjusted with the screws only as the 2nd mirrror needs different angles depending on where its located between max and min travel. It needs to be moved so its traveling in a straight line where center is center all the time between min. and max location. If 2nd mirror is too much to the left, you will get a left movement of the dot on the mirror, and so on.
Use my guide and you will be aligned perfectly. Start with mirror 1-2, aim on mirror 2 center, move the 2nd up close to the tube and check where the beam hit and go from there.
How am I supposed to cut out your tool when my machine is out of alignment?
Most machines can do some cutting even if they are out of alignment, enough to make the tools. They are not critical in measurement so it should work.
If it´s totally out of whack, you need to start with the guide to get it somwhere close to aligned and use the tool for the last perfect fix.
Nope. Mine won’t even cut…I made a big mistake getting this machine without having any kind of technical support and I’ve already wasted too much time trying to figure it out so I guess it’s time to cut my losses and stick to what I already know since this machine has made me seriously doubt my intelligence.
If you want to get one more shot at it i can help you step by step through email or whatsapp, for free of course.
hi HP, I have a problem with my laser alignment, the bottom right is centred the bottom left centred, top right is 3mm below centre and 1mm left, while top left is centred. I don’t really know how to go about this and I need your help urgently because have been on this for like 9days now.
Sorry, my last comment is deleted, i read it wrong. You said 3mm under center, this means the gantry is too high in top right corner. Check underside of the machine if there is a dent in the bottom pushing the gantry up.
Either a dent lifting the gantry, or you need to lift the 3 other corners with 3mm washers between gantry and floor.
If its a dent, push firmly on the gantry (not the moving part, but the big thick metal) and see if you can push the dent back.
Since every upgrade needs a readjustment, i mostly have a non functioning K40 more than a working one 😀
but looking around one question came up:
Should the Lasertube be close to Mirror 1 or farther away?
Ive seen setups where the tube is almost touching the mirror, some medium distance..
I have mine as far back as possible, what is better?
Have the long 40W,Cloudray holders, Upgraded lens and mirrors and thinking of changing the whole gantry to 2020/2040 profiles and linear rails.
This doesnt matter much at all. Only a focused beam is important to have correct distance from material. From tube to 1st mirror you can have 2cm or 25cm, no difference.
Since the backwards alignment has reducing the risk of optics damage as a reason
a quick trick to reduce damage the classic way:
Get some Aluminum tape (or foil) to use behind the tape you are firing at, since it doesn’t penetrate the aluminum, it saves the mirror being aligned from the glue and paper soot from gathering on the mirror until it is aligned.
Thanks for sharing, this is also a good idea to prevent damages on the mirrors!
I have spent the last 7 days trying to align my K40. I replaced the tube and upgraded the mirrors to the cloudray set up. I even bought a 40.00 reverse laser that you put in the laser head to align it. I followed the above guide exactly and have gotten it close but still off. Included picture. I was trying to do the payed help but its showing not available.
Are you really sure you are centering the beam in bottom right corner before moving anything?
Same with 2nd mirror, always center it in bottom position – furthest away from the laser tube.
if this post twice I’m sorry I changed computers and my reply isn’t showing on this.
It’s mirrors 1 and 2 that I cant get lined up. I followed the steps above for those. I lowered my mirror and even had to drill out some more to lower it. I went from that big gap down to the smaller gap but can not get it exact. I’m not sure if I should drill it out more to lower it or not.
I installed the new tube and made sure it was level also checked the level of my gantry and the guide bar that mirror 2 runs on and they are both level.
Sorry for slow reply, i´m on vacation.
It´s so many parameters that might cause this, probably hitting inside the laser head. Feel the nozzle of the head after firing the beam, if its hot you are hitting inside the head.
Send me a email to hp@k40.se and i can walk you through some tests if you still have this issue. The help you get is 100% free, it helps me to understand what you users of the K40 have problems with so i can write better articles to help others 🙂
Hi guys!
Top guide but i have one problem.
You guys only test in the bottom, and have a problem in the top.
In the bottom the laser is in the center, but when i test in the top the laser goes to the right. You can see the problem in attach.
Your gantry is lower in top right corner, remove the bold holding the gantry from below and put in 1-2 washers to lift it.
Start over with the guide and re-center the beam in bottom and then test in top again.
Hi there, thanks for the reply.
But can you show me, where you are talking about
I´m on vacation for a week more, but i will add more pics to the guide when i´m back.
You can feel the bolt from the underside of the machine, loosen it up and add a washer between the floor and the gantry to lift it.
Thank you for the awesome effort and your free time to help us to align our K40 lenses!
I am near finish and dont know what is the issue. Dont want to mess again all steps, so if you have another minute of your precious time to take a look and maybe hit suggestion how to solve this final step which bothers me:
As provided in few pictures.
Did everything you wrote in instructions but when my laser head is in top left and bottom left position – laser point (hit) is centered 100% (Mirror 1 and 2 are centered) – conclusion – works fine.
BUT
When I move laser head to the far right UP and far right BOTTOM, my hit point is the same (which is good) on both positions BUT FAR RIGHT from center (as on pictures).
What should I do to move that spot to the center when laser head is far up and bottom at right position, and not to screw up whole work?
EDIT: Couldn`t attach more photos, so I upped this 6 photos on permanent image hosting to better describe my issue (if its ok with you). Wisdom: 1 picture worth more than 1000 words :))
Thank you!!!
https://ibb.co/HDjt5pJ
https://ibb.co/vPcbpFy
https://ibb.co/QKmqtXq
https://ibb.co/G3gsWfT
https://ibb.co/q1S10dk
https://ibb.co/ZHgpDnb
Do the other way around – always always center the beam in furthest right postion. This way you will notice what the problem is when you move the head to the left (close).
I could guess from your pictures, that your beam is slightly to the right from 2nd mirror. (in the path of the beam, towards you if you stand in front of the machine)
Try again centering the beam in bottom right, then move the head left and watch what it does.
Thanks. I will try with that option. Will post result here.
Cheers
just fitted replacement mirrors (Mo) and lens. They are thicker than stock but doesn’t seem to affected alignment too much only needed to adjust mirror 2 slightly. i noticed that the mirror 2 and mount seem to be getting warm since now touching them , Is this normal ? All this was done as my machine seems less powerful not cutting/engraving as normal
If something is getting warm, you are hitting a edge or similar.
Found the problem. Ran the laser and only mirror 2 is getting hot, replaced mirror with original k9 mirror and it didn’t get hot and cutting ability returned to normal. So returned Mo mirrors as faulty and being replaced with Si mirrors
Thanks for the great article. I was getting stuck on adjusting the mirror 2 bracket, I couldn’t move it any further to the right. I read another post about checking the tube placement. I could see the tube wasn’t aligned with the frame/gantry. I easily adjusted the laser to be straight and that put the laser in the correct range of mirror 2. Just wanted to mention this in case anyone else is chasing their tail like I was.
I did the Alignment and everything is done! But Still i hitting in the front of my laserhead. How do i get it to move to back of the nozzle. Left and right i do with the screws on the right.. But to move forward and backwards?
Lift or lower the laser head, depending on if the beam hits in the front or back. This is required to keep the beam horizontal.
Hello Sir,
I tried to align the mirror as I saw here.
The first problem was that from tube beam was hitting into the mirror quite low, so I raised mirror 1 about 4mm.
Then it was quite easy to align with mirror 2 but I had also to race mirror 2 now.
Then ofcourse I need to race laser head and I did but beam hits it in a corner, and also at top right corner it is few millimeters to high.
I have put laser head on I angle (raised left side) so beam hits center of lens, for engraving it works fine, but for cutting I can see its cuts on a angle.
https://ibb.co/VpnPjmD
https://ibb.co/LQDWQTt
https://ibb.co/YZ2QDy5
https://ibb.co/VHSPf05
https://ibb.co/j4CxchB
https://ibb.co/0qHpY5B
The angled cuts is probably wrong focus.
Check out this article: https://k40.se/k40-laser-calculators/k40-laser-machine-lens-focus-calculator/
thanks for responding 🙂
I have changed quite a lot, so I will repost the steps I took.
I found that I can lift the gantry top right corner with few metal washers which I did but it didn’t make any difference.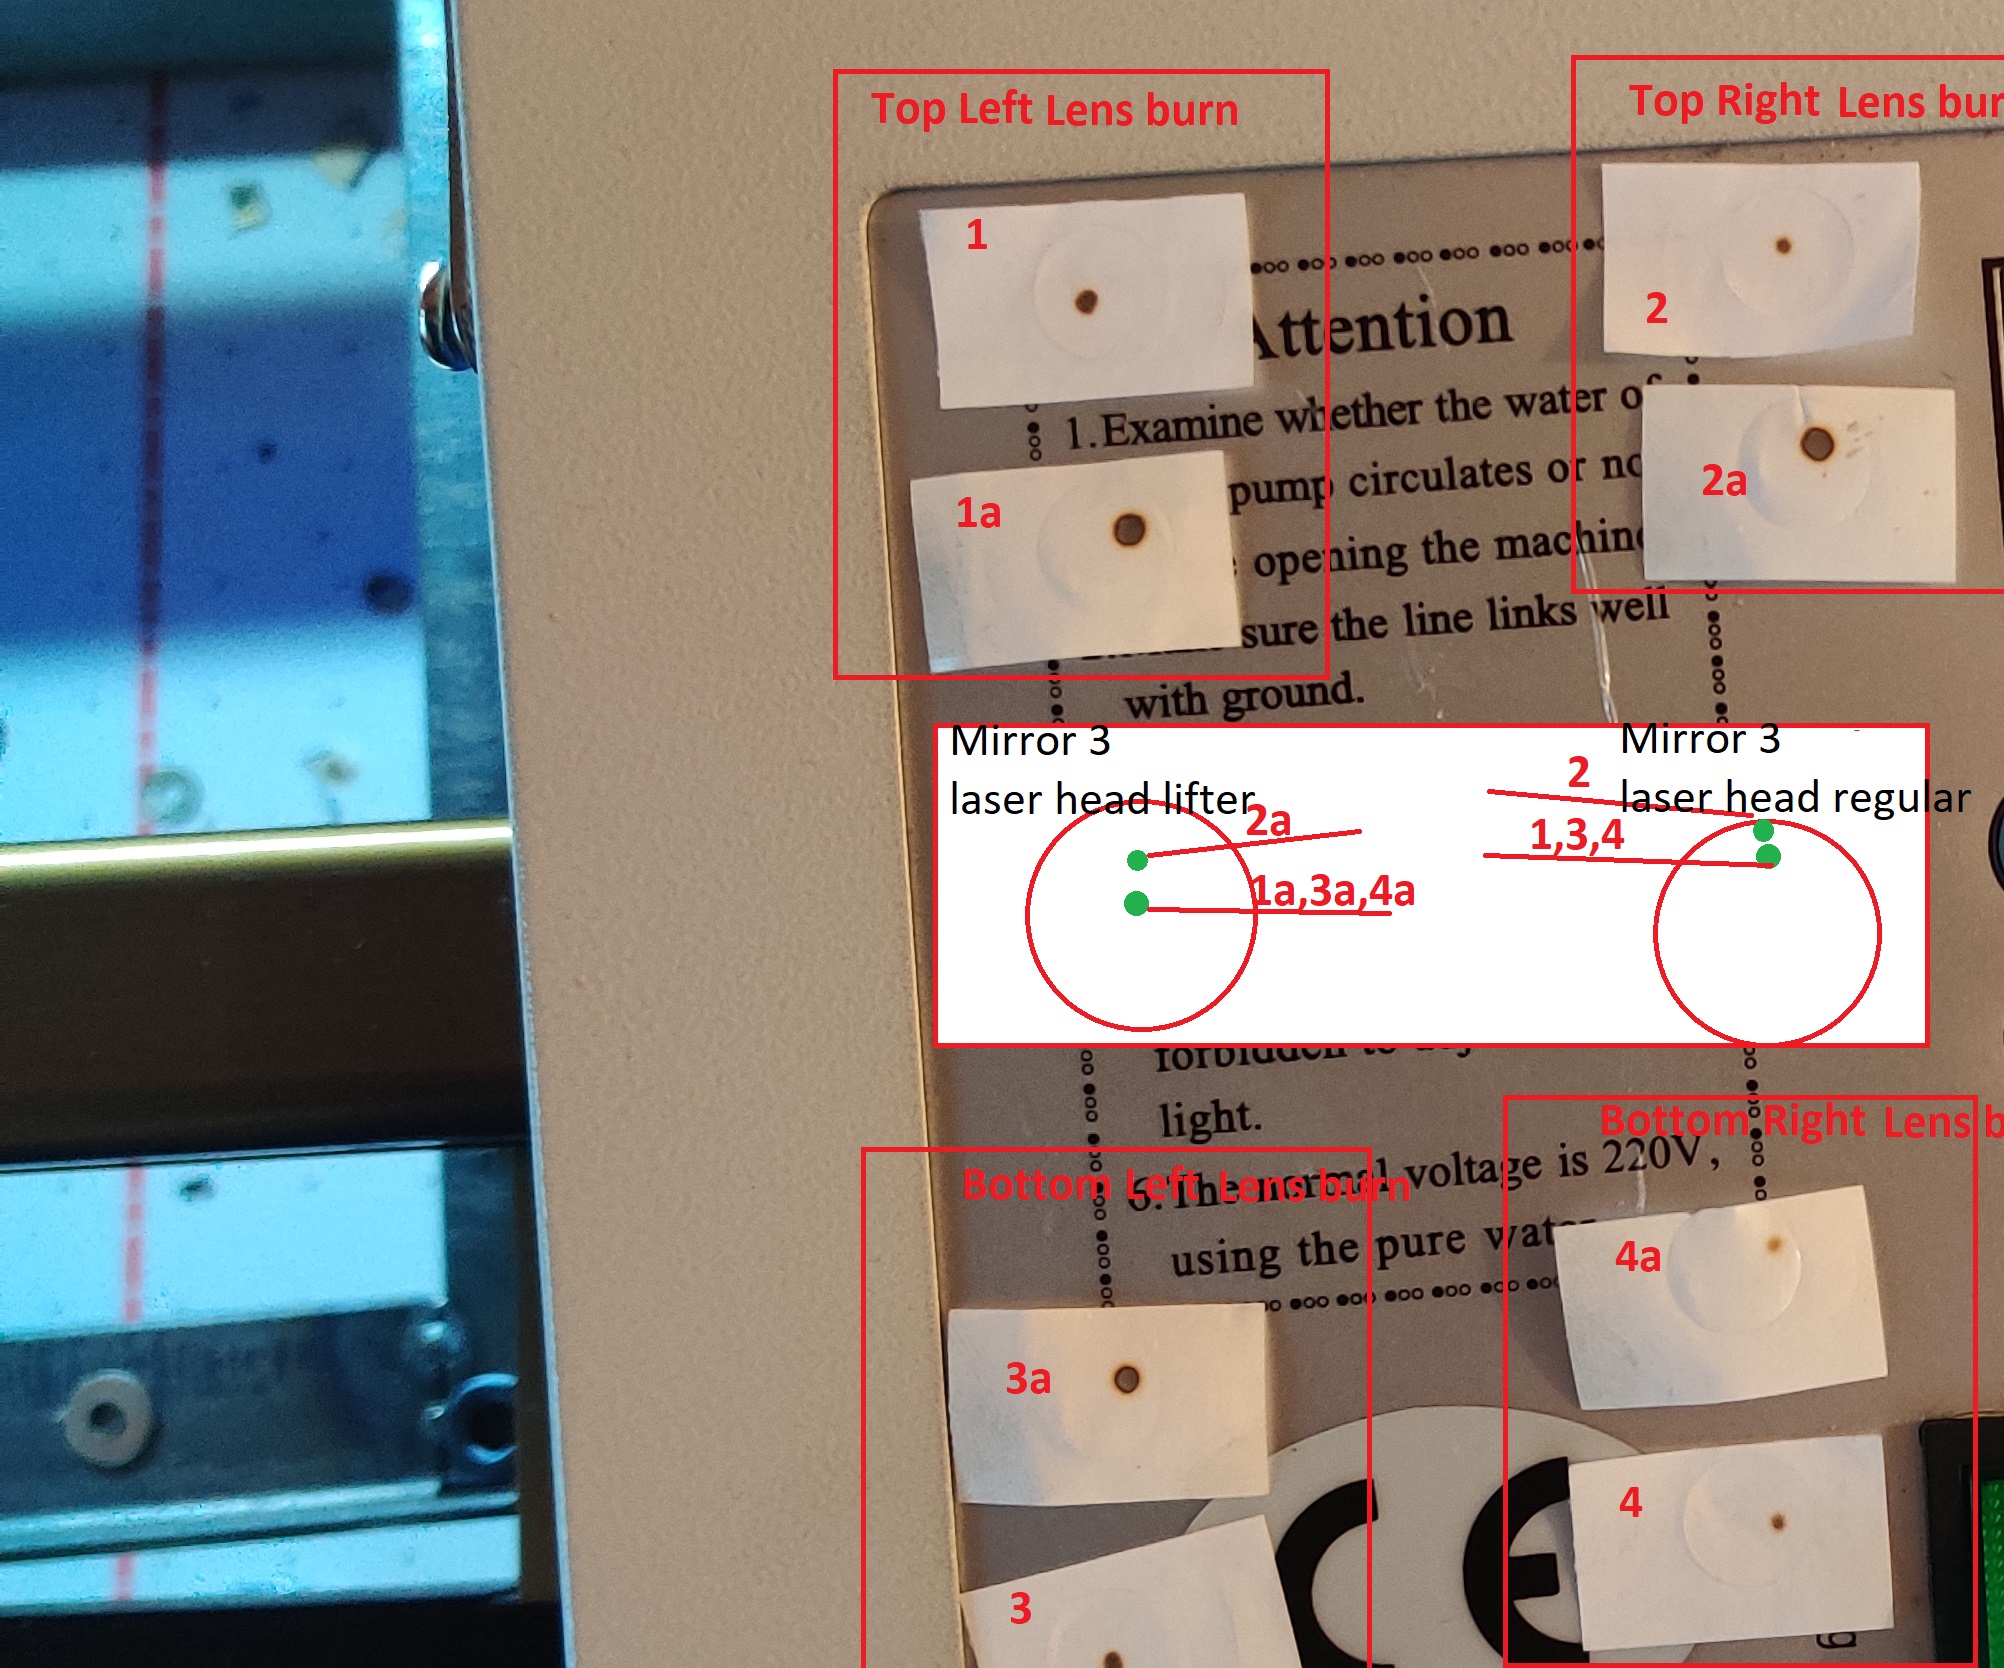
The main problem is that beam from mirror 3 to the lens is hitting in a corner.
This image shows the laser head raised and regular height shots of the focus lens burn from the bottom of the laser head.
not raised laser heads lens shot look better, but mirror3 shots are too high.
I think you are mixing more than one alignment guide now to hunt the issue. This is causing more problems.
Follow one guide only and dont mix in others opinions or tips, other users are not wrong – it will just create more head ache for you mixing alignment approaches all together.
I would do this: Lift the top right corner of the gantry with some washers. Reset the beam in center position in bottom right (center on the lens). Double check so it is center on bottom left (on the lens). After this, test top right and left.
But you have to reset in center in bottom right after each change you do – if not, you get old error + new adjustment as a total error.
When you get problems like this – center on the mirrors are not imporant, just a easy aim to do. Center is only important for mirror 2 in top and bottom position. For the laser head – use beam center on the lens as a guide how you need to move mirrors.
If you have mirror 2 centered in both top and bottom – you only need to worry about centering the beam and you do this with the laser head adjustments. If stock head – use paper to lift the mirror.
Hi ,
I was having a problem in my gantry that was not standing straight in the bed. Took out the gantry and fixed the problem. But know the right side of the gantry does not run smoothly. And when tensioning the left side to tide I won’t run. What is the best way to tension the Y belts
Depends on type of K40, some has a screw to turn to tension it.
Try to loosen the axle between left and right, and run the right side freely, to see if its actually the belt doing it – or the motor and axle. Sometimes if its not straight it can pinch and slow down the right side.
Hey there, I am having an issue aligning my laser after changing my tube. I have went through and aligned it 6 times or so I thought, First couple times I had a shadow. I reset the tube and it appeared center no more shadow. I then adjusted the other 2 mirrors assuming again it was centered on all four corners. On my laser I have a circle frame in front of mirror 1 and mirror 2 so I went off that to set this time and put the tape there? All looked good cleaned mirrors and tried again this time I can not cut through 1/8 wood at even 18 it is a 100w laser with a brand new reci 100w tube.
I am a single mom and was part of the deep freeze in Texas and both my laser tubes cracked with no power of water for days, Bought now 2 tubes first one arrived cracked. I have been down for almost a month now and am running out of ideas. Please help.
The hole in the frame can work, but its better to use a coin that fits over the mirror and tape on that to keep the mirrors clean.
It seems like you still hit a edge or inside the head.
Don´t touch the tube any more, just install it and make it centered on mirror 1 and leave it after that. Any problem you have after that centering is the gantry.
Changed my laser head holder. Have good alignment at all positions on the table. But unit will no longer cut with the power that it had prior. I was cutting 6 mm pine at 8mm jog and 18 percent power. Unit now will fail to cut 3mm into same material at given settings.
It extremely frustrating.
Any ideas
You might be hitting inside the laser head so only partial beam goes out of the head. Put a finger on the nozzle of the head after you tested it – if its warm you are hitting inside the laser head.
How would that happen. Bad alignment on head mirror ?
Yes, or bad alignment on the 2nd mirror so the beam travels over the head mirror causing it to hit inside in different locations.
You can test this: Remove the lower nozzle part and put a piece of tape over the hole, test fire in each corner of the machine and look at the tape. You should have 4 spots in the middle, if not you are not aligned properly.
I have two issues. Beam hits center on laser head mirror. Burn is off center. Mirror was shimmed originally but I changed brackets for the head to one that wasn’t bent from the factory. If you turn the laser head mirror left or right does that effect where it will hit on the lens ? Almost changing the angle of the head mirror?
It’s brand new and I already broke it I have another one I used for like ever. And I bought this one because it was nicer.
.
It might be the bracket is leaning, make sure the head is 90 degrees to the gantry first.
Rotating the mirror should not do anything if its flat. If its not flat – the mirror is broken and should be replaced.
Does the beam hit center on the mirror in all 4 corners?
Put a tape under the head and see where it hits the lens too. This will tell you whats wrong.
It appears that I have gotten the laser fixed and focused. Do you have a suggestion for a new laser head. With screw adjustable head mirror that is short enough to work on the k40.
The lens ended up needing shimmed . It was shimmed when I took it apart. And I would like to be able to just turn screws to adjust it not paper shim it.
Thanks for the help btw.
Your knowledge was excellent
The upgraded laser head i write about in this article is the best. You can adjust the height of the nozzle to perfect focus.
https://k40.se/k40-laser-upgrades/laser-head/
I tried to follow your guide but am having problems. Mirror 1 is centered, by mirror 2 I’m getting 3 small holes and by mirror 3 I’m getting nothing. Mirror issue? Laser bad? Laser is pinkish purple when firing but the power is diminishing or very poor for some reason. Only has this like 2 weeks, worked fine out of the box but now this 🙁 any help would be appreciated!
Often this happens when you hit a edge of the mirror causing the beam to split. If you have a solid dot inside the mirror on 1 you can rule out this.
Try to use more power, if you still get a split beam there is a tube or power supply problem.
It can be the lens inside the laser tube, but you should get a split beam on mirror 1 too – but you can check it with a small mirror, look inside the output end of the tube and check the lens.
Let me know and i can show you some more tricks to test.
Hi,
I do have a similar problem;
I checked the alignement of the mirrors. They are still fine.
but I don’t have a clear dot on my mirror 2 and more or less two circles on my mirror 1.
I added a picture of the test shots on mirror 1 (post-it on top) and 2 (post-it on the bottom of the picture).
Do you know how to fix this?
This can be many issues. You can try with moving around the mirrors. Move mirror 2 to the laser head and from head to 2. Just to see if the problem moves.
The donut-shape is a sign of a weak tube though, it´s called TEM-01 – you can google on that. It´s often due to a tube on its way out with weak power, the gasses are low or in wrong composition.
This can happen if the tube have been running hot or often on very high power (over powering).
thanks for your help. I alligned the mirrors again. Mirror 3 was out of line so that’s better now.
But I still have a 2 cirkles to begin with so that’s not ok. Because the cirkles are getting bigger on every mirror.
It seems like the beam is getting splitted or something.
is there a way to check if the tube is damaged other then watching the cirkle?
Can i see something in the tube itself?
It would be really bad if the tube allready died because I barely used the machine.
thanks!!
The shape of the beam is whats telling me its not going into correct state (transverse electromagnetic mode). Correct state of TEM is 00 – which is a dot. The first problem a beam can get into is Tem01 – which often is a split beam – or donut shaped beam.
These modes depends on a lot of things happening inside the tube – i will not go into details though.
The %-output on the display on the machines are not accurate, you can have overdriven the tube even if you are below 100%. Most machines can reach 100% at 70-80% on the display, this is why its important to have a mA-meter showing the real output.
Using hotter water than 20c will also cause quicker deterioration of the gasses inside, it will not regenerate Co2 as much as it should do and the tube will fail quicker.
If you have hot water and used more output than it could handle, the tube will die quick.
Make sure you are hitting inside the mirrors and lens everywhere before buying a new tube.
And make sure to install a mA-meter and keep a eye on the water temp with the new tube.
Thanks for your answer, it really helped me!
Hi
Thanks for these instructions, I was chasing my tail until I found them.
I think I am close just not quite there.
Mirror 1 is in the middle, mirror 1 to mirror 2 is square, mirror 2 is is the middle.
Bottom right is correct, bottom left is correct. But top right is off, 1mm left and 1mm up. Top left is halfway between the placement of the top right and being centred.
Also, when the laser passes the lens, it also comes out to the right by 2mm (opposite side to when the beam enters).
Any advice please?
Thanks.
Your gantry is lower in top right corner. You can lift it with metal washers between the gantry and the floor. Dont forget to start over with the alignment, otherwise you get old error + new correction as total error.
The lens exit is due to this problem, so it will correct itself.
Thanks for getting back to me.
Im now even closer but not there yet. I raised the back right by 1, 2 and 3 thick washers. 1 wasn’t enough, 2 brought the top left into line, but 3 made it go out again.
So with two washers, the 1st and 2nd mirrors are aligned and in the middle, bottom left is centre, bottom right is centre, top left is now centre, top right has come down to be level with centre vertically, but 1-2mm to the left.
I have attached a pic, the 3 centre dots are on the right, the off one (top right) is on the left.
Any more advice please? Thanks very much.
You can try this. Under the cover in the bottom you can find a axle between left and right side.
Loosen the screws on the coupler between the motor and axle, and move the right side down a bit. Use a 90 degree angle/square tool to make sure the gantry is in perfect angle with X-gantry, and tighten the coupler again.
This will cause all your alignment to go out of whack, but you can easily start over with centering the dot in bottom right, test it in bottom left. If its ok, move and test other locations. If it doesnt line up you might need to adjust the coupler a bit again and move either side up or down to make it aligned.
If the right side is higher than the left side, it will move the whole gantry crooked, and the right side will be further up in top position than left side is.
Afternoon
Firstly thank you for the guide, have used it myself multiple times, as well as advising others to check it out.
On the current machine I am working on, the everything is spot on as above, except the drift to the left when in the Back Right Corner.
I have identified the bar and coupler (original bed is stripped from this machine, but am unsure what you are referring to move etc.
Are you able to advise further?
Loosen the coupler on the axle and make sure the X-gantry (left-right) is 90 degrees to the Y-axis (front-back) and then tighten the coupler again, this should eliminate the sideways movement.
Easiest to do this is to move the gantry close to you and use a 90 degree square against the Y-rail.
Thanks for the great guide, I did everything as instructed but I didn’t get a good result. Namely, the laser does not cut up to the right and it cuts perfectly on other parts. I checked the mirror settings and
Bottom right: centre
Bottom left: centre
Top right: centre
Top left: up from the center by 1mm
I didn’t try to adjust the beam because I will disturb the other sides. What can I do to fix it? Thanks in advance. I Sorry for the bad English.
Your gantry is not level, if top left is up from center, this corner needs to come up 1mm. You can do this by adding metal washers between the floor and the gantry in your machine.
After you do this – you have to align the machine again from beginning.
So I have a perfect dot on my mirrors all where stated. Mirror 3 perfect same dot in the centre
but when I move the mirror 3 to the top left or right the dot is quite off centre for both tests. Does this mean my gantry is off?
Yes, your gantry is leaning if the dot is up or down from center. If dot moves up the gantry is lower in the back, if the dot moves up the gantry is higher in the back.
If its to any side, the gantry is skewed.
had to replace my lens. did your test i had to move my 1st mirror in so the laser tube would be center.(i believe this might be my mistake) continued to line all the other two mirrors up and finally at the head assembly my bottom left mark is dead center but when i move the head to the bottom left it goes up and becomes double
You said left two times, which is the right? If it lifts on left bottom the laser head is too high.
Double dots often is a edge hit on a mirror, double check with tape or paper.
So i have all my corners alligned except for my top right. I aligned all my mirrors parallel, not to the center. I also just re aligned my bed to 0.1mm difference on all ends so it is very straight and i raised all the other 3 ends to make the top right lower (as suggested everywhere online) but it did not change where the beam was hitting. I also tried shimming 4x the distance i needed but i still did not make a difference where the beam was hitting so the shimming is clearly not the problem. I do not know what do now. If i align the top left corner and the top right corner, than the bottom left corner hits too low (essentially the same thing as above but reversed), so i am truly confused as to how to fix this problem. Any help would be extremely appreciated as this issue has made me pretty upset.
You never align the left side – this is automatic by aligning the right side.
You only check movement on left side, nothing else.
Try this: Move head to bottom right: Center the beam in middle of the mirror/hole on the head.
Move to left and test-fire: Tell me the result.
Also, test-fire in top right and top left without moving the mirrors: Tell me the result.
Thank you for the speedy response, it means a lot
Bottom right: centre
Bottom left: centre
Top right: below center
Top left: centre
Attached is a picture showing how the beam hit the tape on the laser head. The middle beam is darker cause all the other 3 sides of the machine hit at about the same spot, but you can see that the top right is sitting too low for some reason
If you hit inside the head and hit the lens properly that difference is nothing to try to fix, it´s just a millimeter roughly and it will not make a difference on quality of engraving or cutting.
Only if you hit inside the head or edge of the lens it´s needed to be fixed.
Judging the picture, your top right is a bit higher than the rest of the gantry. It can be a bulge in the bottom of the floor. You can probably just put your hand in top right (not on the head) and push down a bit and try again. The floor metal is pretty thin and bend easy.
To fix this you need to lift all three other corners, or try to lower the top right. But as said, it´s so little i would not put any time in to it.
I would say you have a perfectly aligned machine right now! Just double check if you hit inside the head properly and center of lens in that corner.
Thank you very much for the assistance, I will see how well it cuts as soon as I have the time, and if it is not adequate I will try the above. One last thing. my 30mA Current Meter that came with my k40 (analog version) does not appear to work when the laser is running. I can get it to work if I tap the top but then in a few seconds it stops again. Any idea on how to fix this? I know this is not directly related to mirror alignment but someone else on here may also encounter a similar issue.
Also to note, those 4 red dots around the circle are just an indicator for me to see approximately how close I am to the centre (not actua laser burn marks) because my eyesight is a bit poor and I have trouble making out the circle else wise
This is, by far, the easiest tutorial to follow. Thank you for putting so much work into it!
I have a quick question, if you don’t mind. I’m having a hard time aligning mirrors 2 and 3. I need the beam to fire down and left more, but I can’t seem to get the top left and bottom right corners of mirror 2 close enough to the back plate because the screws come apart from the front plate. Am I missing something? Is there a way to remedy this issue? I appreciate any help yours willing to offer.
If you run out of length on the screw, bottoming it out or almost falling out – you can set the screw half way in. Then you need to loosen the screws holding the complete mirror assembly, turn it slightly – fasten the screw and test-fire so you can see it turns the right way you need.
After this adjustment you can then fine-tune it with the adjustment-screws on the mirror. The holes should be slightly larget than the bolt so you can twist it a bit.
Start with mirror 2 and it should fix the issues on 3 too.
Nice guide, thanks. Even if everything in K40 regulation is pretty much evident, I am facing problem that is currently breaking my head in two.
I brought home K40 from public workshop for some laser cutting. I noticed that it does not operate at the power it should. After disassembling the head the problem was evident – third mirror (that brings the beam vertically down) and focusing lens should be better replaced.
After receiving both mirror and lens from aliexpress I assembled the head together, but now the beam does not hit anymore into the center of the bottom hole. Putting a piece of paper or two under the third mirror does not help – now the upper edge of the mirror is to be lifted about 1.5 mm to direct the beam vertically down! And such deviation is far from “fine adjustment” term.
I just totally do not know what happened. It worked fine previously. I believe I did not lost any parts nor anything seems to be missing from the assembly. Overall geometry seems to be fine for the first two mirrors, and in fact this have nothing to do with the current prob 🙁
I just can’t figure out… 🙁
Sounds to me that your laser head is leaning, check it by measuring left and right edge on the plate holding the laser head down to the bed to see if it´s leaning.
You probably have it leaning so the beam hits the edge of the lense.
You can download the Lens Tool from download page, if you can – cut it in 2 or 4mm acrylic and fasten it to the laser head. Put tape on the hole in the tool and test-fire with the laser head in all 4 corners and middle, this will show you if the beam hits on the side or misses the lens.
You can 3D-print it too if you have a printer and cannot cut. Lens Tool here -> https://k40.se/downloadable-files/
Hello! Your guide is great and much appreciated. I have an issue I didn’t see in the comments and previous answers, I am sorry if I missed it. I have aligned my test fires and they line up but when test firing with the head at front right (closest to me, right side) through about halfway up towards the back right, I get no dot. As I get closer to the back right, I start to get the burn mark and at the top right it’s aligned with my back and front left dots fine. But that whole front right quadrant seems to get no power in the test fires as it won’t mark the paper on mirror 3.
I should add that if I repeatedly fire in bursts I may finally get a tiny dot which does seem in the correct place, so it doesn’t seem that the bean is out of place there just very weak
Any ideas on the cause?
A quick test is to follow mirror 1 and 2 in all positions (put a coin over the mirror and masking/marking tape over it), test fire in all 4 corners + middle of the bed and see if the beam in some location misses or hits the edge on mirror 1 or 2, which is the scenario i can think of with your description.
If you need more help, feel free to contact us at help@k40.se and we will make a step-by-step checklist for you. This help is completely free.
Here is a little trick that I learned on my K40. To help ensure that the thumb screws do not move while tightening the lock nut, I use a pair of 8″ curved Hemostats to hold the thumbscrew. Now, as I tighten the locking nut, I can securely hold the thumb screw and keep it from turning. This really helps cut down on the errors incurred by trying to hold it by hand while tightening. Also, the Hemostats can get in those tight places where my fingers do not like to go.
Hello
First theank you very much for this isntructions .I do all the steps but one i can not get it wright .STEP 3 dont matter what i do the beam move 2 mm up …i try to put something onder to elevate the head but still i get the twoo mm diffrence .Do you please have any ideea what can be .
Kind regards
Razvan
The only solution is to lift the laser head. Make sure you reset the beam in bottom right position before testing again – if not you will not see the difference.
Like this: Add something under the head to lift it 1mm, a metal washer or similar. Then move the laser head to bottom right – Test-fire your laser and adjust mirror 2 until you hit center on the laser head, then move the laser head to bottom left and test-fire again to see the difference made by your lifted head. Add more if needed.
Hello, I am having an issue aligning my mirrors. I’m stuck on the first step. After I adjust the screws on mirror one so that the laser hits the center of mirror two in the far position, I move mirror two to the near position and test the laser again. There is no change vertically, but horizontally the laser is firing several mm to the left of center. The guide says to adjust the white plate that mirror 2 sits on to correct for this. However, I can only adjust the plate 1-2mm before it is scraping against the side of the frame and prevents the gantry from moving. And, I don’t notice any difference in results when I make this minor adjustment and then start over from the beginning. Is there something else that could be causing my 2nd mirror to be in the wrong spot? And, is it normal to have so little room to work with when moving the white plate?
You can get the same effect by moving the 1st mirror further away from the laser tube to get better adjustment of the white plate.
This problem is due to faulty installation by the manufacturer, they just drill holes and guess the alignment.
A skewed gantry could give similar effect. Measure it diagonally to see its square.
You can align this slightly on the laser tube too, by moving the tube holder further back on the right side (seen from standing in front of the machine) but it will never be 100% with this method as the gantry is still out of whack with the 2nd mirror not 90 degrees to the 1st.
Thanks for the help. I ended up moving the whole gantry (and consequently mirror 2) as drilling new holes for the first mirror would have been a lot more work. When I moved the gantry as far to the right as the pre-drilled holes allowed, I was able to get everything aligned in a matter of minutes. I’m guessing it had shifted during shipping.
after did all of this and 3rd mirror is centered and i try to cut my wooden piece but unfortunately it is not like before.power is very lower and why is it?
Make sure you hit in the center of the lens and not hitting the inside of the laser head.
My laser is hitting the edge of the lens how do I fix this please
First make sure you are hitting center on 1st and 2nd mirror in all positions.
After that you can adjust the 3rd mirror to align the beam to center. Depending on the laser head you might need to put in thin paper on the edge of the 3rd mirror to lift it in one corner to aim the beam.
Put the paper on the opposite side of the beam. If it hits on left edge (seen from the front of the laser) – put a piece of paper on the right side of the lens between the laser head and mirror. Test fire again, you might need to fold the paper to lift it more.
If you have a adjustable mirror, use the thumb screws to align the beam in the middle.
Thanks I will try this
Thank you for the excellent guide. you made my alignment an easy task to do.
I love you man. 3 days of work and nothing. 30 minutes with your guide and everything is perfect. Thank you very much
Thank you for the mirror alignment instructions. I have my mirrors aligned, but when I start my engraving project, there is a shadow. I’ve had this problem before and fixed it, but I cannot remember how I did it. My mirrors are aligned and clean. Any suggestions?
Thanks.
You are probably hitting a edge inside the laser head creating a shadow/reflection.
got a question. in the beginning of the guide it says if the test fire it to low or too high at the second mirror, then the bracket for mirror 2 maybe to low or too high. what about any adjustments to the screws on mirror one. do they ever come into play?
im having an issue where i cant really cut anything on the right hand side of the cutting platform. lens and mirrors are clean. i dont appear to be hitting the inside of the air assist nozzle.
Only use the screws to adjust the beam so you hit center on the next mirror.
Like this
Adjust the screws on mirror 1 – so the beam hits center on mirror 2 when its furthest away (down)
Adjust the screws on mirror 2 – so the beam hits center on laser head – when its furthest away (down right)
After this, you cannot correct any deviations with the beam moving over the surface in different positions with the screws, you have to move the 2nd mirror holder or laser head left-right or up-down depending on the movement of the beam when you move the gantry.
Hello You say to add a shim on the mirror to raise it ?? what is a shim ? how do i do that ?
Thank You
Can be anything, i personally use acrylic or metal/aluminium. Washers, thin metal, or acrylic if its bigger gaps.
But metal is the best, as it doesnt compress. Washers for bolts works good, as they already have a hole in them.
Hi there, first let me say thanks for the articles, very helpful. I have just bought one of these machines and your alignment advice is great for me, the only thing that I am struggling with is the lens adjustment using the tool – would it be possible to add a photo to show the tool in place to help understand the usage?
I am trying to get my machine to cut MDF and acrylic, and so far test pieces show that with the 40w tube I can only cut a maximum of 1mm deep in one pass, and to get any deeper requires many (15+) passes, so am suspecting that something is up with the lens alignment. Of course, I had to follow many of your tips to get the machine to that stage! They are cheap, but you get exactly what you pay for!
Make sure you have correct focus, read this article: https://k40laser.se/diy-how-to/setting-the-proper-focus-in-your-k40/
If you still have problems, i would look at mirror and lens quality, check if you have any spots or damaged surface.
Amazing guide had to shim up second mirror and shim up right side of my tube now my beam on all mirrors are centred cuts like a dream!!!!!!
How much to have you help me align? I can’t figure it out. Mirror 2 hits center and mirror one is off to the far left and down. About to the rim of the mirror.
Mirror 1 closest to the tube doesnt matter, just hit inside the mirror.
2nd mirror – adjust the screws on mirror 1 until you hit in aprox. center on mirror 2 in furthest position – move up close to see what´s needed to be adjusted.
3rd mirror – adjust the screws on mirror 2 until you hit in aprox. center on mirror 3 in furthest position – move up close to see what´s needed to be adjusted.
Dead center isn´t needed either, the important thing is that the beam doesnt move over the surface depending on location of the gantry – this will cause issues with sizes and engraving quality/position. I just use center as a good location to aim for in my guide to align your machine.
I´m on vacation right now so i dont have the tools or time at the moment, just looking in on the comments now and then.
ha if all mirrors are in alignment but the laser beam is hitting on the inside of the air assist head what is the fix for that?
3rd mirror not aligned 90 degrees from the beam, so it hits inside. Or the head not level.
Have followed Your guide mirror 1-2 hit centre target but not dead, Moving to mirror 2 – laser head, at the bottom right target hit centre at bottom left target hit centre but not dead, moving to top right target hit up to the right. Please help with solutions.
This is often beacuse the gantry is lower in the top right position. Remove the bolt holding the gantry and add some washers between the “floor” and the gantry to lift it. Double check alignment in bottom position and then check top right again, add more if needed.
URGENT!!!! in your mirror alignment guide you said we should place mirror 2 at the far end before setting, you now mentioned ADJUST MIRROR 1 UNTIL IT GET TO CENTRE OF MIRROR 2, my question now is, are we to adjust the mirror with the knob behind mirror 1 or adjusting the mirror itself to get the dot to the centre of mirror 2.
Always adjust the knobs on the mirror before the one you are aiming at.
If you aiming at mirror 2 – adjust 1
If you aiming at mirror 3 – adjust 2nd
And you always do this in the furthest location away from the mirror you adjust the knobs on – and after that move it up close to see what more adjustments needed on the gantry or mirror holder.
When you have placed the beam in middle of 2nd mirror, or 3rd mirror and you get problems when its moved closer – you cannot adjust this error on the knobs, it has to be done on the base of the mirrors itself as explained in the guide.
After the centring from the bottom left of mirror 1 to mirror 2, moving mirror 2 close to mirror 1 the DOTS are beside each other with the use of the 3 knobs behind mirror 1, in your guide you said we should loosen the mirror 2 and slightly move it to the right and start all Again.
My Question is, DO WE NEED TO UNSCREW THE 3KNOBS TO IT ORIGINAL POSITION before starting allover with the alignment and re-centring.
After you move the mirror holder or laser head, start over with centering the beam in furthest position again. Dont move the screws until you need to move the beam to center. Then test-fire up close again to see if you need to adjust it more.
is there a guide pr can you tell me how to adjust my x axis belts? there are two philips that adjust tension, but i cant tell which way to adjust. im getting curved lines where there should be straight lines. Im very frustrated over something that seems so simple! Thank you
Do you get curved lines in all axis? The belt should not be super tight, but at least give some resistance when pushing on it.
Also check the wheels, if they arent perfectly round or worn out it will make the laser head move or vibrate creating strange lines.
Bad alignment can also make this, either by hitting the edge of a mirror or lens – or inside the laser head.
Hi, I have aligned all the mirrors, but nothing comes out of the head. I have placed a small bit of card between the 3rd mirror and the lower lens. There are burn marks on the card, a bit off center but they are there. I just don’t know what to do next. I have polished all the mirrors, turned the lens around so much I now don’t know the correct way, is it the oval face facing up or down. I thing that it must be that somehow the beam is just not hitting the lens center, but how do I adjust that.?…
Rounded surface is up. But if you do not get any burn marks below the lens, make sure the beam is hitting straight down. You are probably hitting inside the nozzle or the edge of the lens. If you have the original laser head, check out the download section for a piece to use to see where the beam hits. You need the laser to cut it though, but it can also be 3D-printed, or cut by hand in thicker cardboard.
Hej HP,
1000-Tak for dit fantastisk fine styke arbejde!, det har sparet mig for mange timers arbejde.
Har det rigtigt godt
mvh
bern.dk
Thank you for your work preparing this tutorial.
My 2nd mirror when its far from the first mirror its perfectly in the middle but when it gets close to the first mirror it goes to the upper right corner only for like two and a half millimeters.I wanted to ask if you can tell me a way to solve this problem.and get it perfectly in the middle in both ways.When its close and when its far.i already tried to adjust it but it didn’t work.
The only solution for this problem is to move the 2nd mirror holder about 1 millimeter to the left (towards the side of the machine), loosen the two screws holding the white bracket. After this, put 2nd mirror in bottom position, test-fire and adjust until you hit center – then move up close and test-fire to see if it aligns in center.
To adjust the height difference, you need to lift the gantry in top left position – add a washer or two between the floor and gantry. You need to unbolt it from underside. After adding this, center the beam in bottom position before test-firing.
I’m centered on step 3 and step 4 but when I put the leaser in home position it’s high right
Your gantry is leaning down in top right position, add washers or similar between the floor and gantry to lift it (top right only).
Zero the beam in bottom position after you added this before test-firing again.
My stock Blue/White K40 tube hits the first mirror quite low– down by about 4.5mm. I can’t lower the bracket the mirror is mounted on so I assume I need to move the tube itself upwards. The large plastic brackets that hold the tube don’t appear to have any up/down adjustment. Do I unseat the tube from the plastic brackets and place shims under the tube? Or rather, I should ask “What is the correct way to up/down align the tube?”
1st mirror is not that important, the 2nd is though. But if you want to lift the tube – put some shims between the metal and the holders of the tube, use acrylic or wood. Then start over aligning it on the 2nd mirror and go from there.